Correcting the Core
- alyshajadeoconnor
- Oct 20, 2021
- 5 min read
Hi there!
Welcome back to my blog. This week we are correcting the core, ready for making a fibreglass jacket next week.
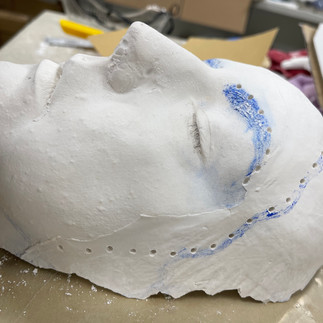
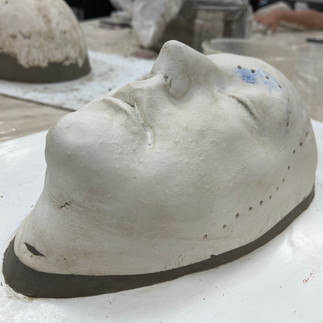
Figures 1, 2 & 3: Drilling Holes in the Core (O'Connor, 2021).
Holes were drilled in to the plaster core to mark out where the hairline and eyebrows were. This was done because the aqua paint lines were going to get washed off and there needs to be some marker of the hairlines and eyebrows to determine how far the sculpts could go. In order to get rid of any unwanted textures or bumps from the bald cap, the core was then sanded, but was done gently so it didn't remove any of the skin textures and details.
Figures 4, 5 & 6: Correcting the Core, Building a Wall and Creating Keys (O'Connor, 2021).
The core was then transferred onto a board where the correcting can begin. The core needs to be corrected because of the undercuts. Undercuts can cause issues when coming to run prosthetics because it can tear pieces and can cause the positive and negative moulds to lock together. Toxic Image Studios (2018) says that all the surfaces should face upwards. He goes on to demonstrate the same method that was completed by myself: using water clay to fill in the undercuts and using clay kidneys to smooth the edges, and finally using water to smooth everything out and make the edges blended.
A wall was made using buff clay, this was made to catch the silicone when it got poured on, so it is like a little well. Keys were then made and attached onto the wall. Keys are an essential part to mould making because they ensure that everything stays in line. The keys were made the same thickness and size and were made at a 90 degree angle. Winston (2015) shows in a YouTube video how he does his keys at a 45 degree angle and he finds that if you make keys quite square they tend to break easily. A silicone sculpting tool was used to attach the keys to the wall, they help to create a smooth blend between each parts of the clay, they also helped get the clay flush to the board. Once this was all finished, the core was now ready for the silicone layers.
Tools and products used when correcting the core and creating keys

Buff Clay is a water clay which is used mainly for large sculptures and mould making (Neill's Materials, 2021). It is ideal for creating walls, which is why throughout the whole project, buff clay has been used when building walls and correcting cores (Mouldlife, 2021).
Buff clay was used to correct the core because it is cheap and is very easy to smooth out due to it being a water based clay.

Clay kidneys or rubber kidneys are useful tools when it comes to sculpting. They are used to smooth and shape clay, which is exactly what it is used for when correcting the core (Cromartie, 2021).

Silicone sculpting tools were used when creating the keys. They are very similar to the clay kidneys in the sense that they are used to smooth and shape the clay. They were used to get the clay flush against the board and to get rid of any undercuts that may have been present.
Silicone Layers
PlatSil FS-20 silicone was used when doing these layers because it has a de-mould time of 25 minutes, which is very useful when there are multiple layers to be added, like this core. This silicone has a ratio of 1A:1B, making it very simple and easy to use. The silicone cures to a milky white colour, but can be coloured with silicone pigments (Mouldlife, 2021).
The first attempt at the silicone layer failed because there were far too many air bubbles in the layer, which can be seen in Figures 10 - 14. The air bubbles went on to the face, which meant that the layer had to be removed and discarded because it wouldn't have been able to be used to create a new core because of the missing details. This is because the silicone was not poured from a height, meaning the trapped air didn't have time to go, so settled on the
Figures 10, 11, 12, 13 & 14: Silicone Layer Fail (O'Connor, 2021) layer. This meant that the wall and the keys had to be made again.
Figures 15, 16, 17, 18, 19, 20, 21, 22 & 23: Silicone Layers (O'Connor, 2021).
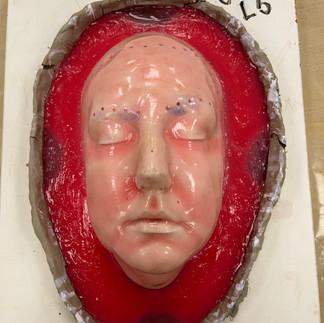
The silicone layers have been coloured red this time, just to differentiate between the first layer fail and the next layers, but colouring is not essential. The first layer was added, but this time was poured from a height, as seen in Figure 24.
A second layer was added, however, once 25 minutes had been the silicone still had not set, which was strange considering the first layer did. This was left another 10-15 minutes, but still it had not set. Soon after, realisation that two measures of part A had been mixed rather than equal parts of A and B had been made.
The tutor was informed and she assisted with
the next steps: mixing two measures of part B
Figure 24: Pouring Silicone (O'Connor, 2021). and, using spatulas, try to swirl and mix the
silicones together, but being very careful not to damage the silicone layer beneath. This did set, but only to about 80% and it was still quite sticky in some areas (Figure 19, above). Normally, only 3 layers would be done, but because of this mistake another layer had to be added to 'seal in' the sticky layers.
Once this layer had set, it was time to move on to the polyfibre silicone layers (Figures 21 and 22). These layers are done to strengthen the silicone and to reinforce it because the silicone is flexible and can tear. These layers get added to everywhere except the keys as they are going to get cut out as seen in Figure 23.
Once these layers had set, the wall was pulled away and the keys and edges were cut and trimmed (Figure 26). This was now ready to get gel Figure 25: Polyfibre Silicone Layer (O'Connor, 2021).
coated and make a fibreglass jacket.
Thank you for joining me for this weeks blog!
Next week will be the process of the gel coat and making the fibre glass jacket.
See you then!
Alysha:)
Figure 26: Cutting the Keys and Trimming the Edges (O'Connor, 2021).
Reference List:
Amazon. (2021) Clay Sculpting Tool [Online]. Available at https://www.amazon.co.uk/Clay-Sculpting-Tools-Professional-Silicone/dp/B07GKF8H3H (Accessed 20 October 2021).
Artway. (2021) Rubber Kidney [Online]. Available at https://artway.co.uk/major-brushes-rubber-kidney/(Accessed 20 October 2021).
Cormartie. (2021) Rubber Kidney [Online]. Available at https://www.cromartiehobbycraft.co.uk/Catalogue/Potters-Tools-and-Accessories/Rubber-Kidneys#.YqoJEy8w1QI (Accessed 20 October 2021).
Making a corrected life cast (2018) YouTube video, added by Toxic Image Studios [Online]. Available at https://www.youtube.com/watch?v=XeRoxp966OU (Accessed 20 October 2021).
Mouldlife. (2021) Buff Clay [Online]. Available at https://www.mouldlife.net/buff-clay-5891-p.asp (Accessed 20 October 2021).
Mouldlife. (2021) PlatSil FS20 [Online]. Available at https://www.mouldlife.net/platsil-fs20-silicone-rubber-4153-p.asp (Accessed 20 October 2021).
Neill's Materials. (2021) Buff / Air Drying Clay [Online]. Available at https://www.neillsmaterials.co.uk/product/buff-air-drying-grey-clay/ (Accessed 20 October 2021).
O'Connor, A. (2021) Correcting the Core, Building a Wall and Creating Keys [Images]. York.
O'Connor, A. (2021) Cutting the Keys and Trimming the Edges [Video]. York.
O'Connor, A. (2021) Drilling Holes in the Core [Images]. York.
O'Connor, A. (2021) Polyfibre Silicone Layer [Video]. York.
O'Connor, A. (2021) Pouring Silicone [Video]. York.
O'Connor, A. (2021) Silicone Layer Fail [Images]. York.
O'Connor, A. (2021) Silicone Layers [Images]. York.
Winston, S. (2015) How to Make a Latex Mask: Mold Making "Keys" - FREE CHAPTER [Online]. Available at https://www.youtube.com/watch?v=2venqA33nwI (Accessed 20 October 2021).

















Comments